
To start your unit, ensure the water line is connected and the wire arm is in the down position, as this is how to work an ice maker effectively. Most models begin producing ice within 24 hours once the freezer reaches the correct temperature.
Items to work your ice maker
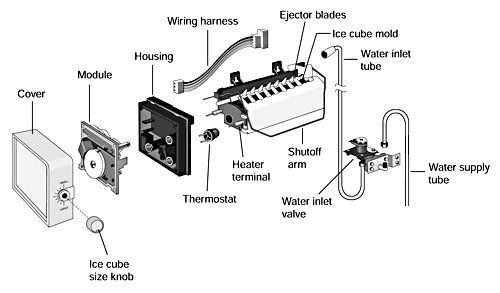
- Water supply line: A flexible plastic or braided steel tube connected to a cold water source.
- Water filter: A clean, manufacturer-approved cartridge to ensure the quality of your ice.
- Ice bin: The original container designed to slide under the mechanism.
- Control arm or switch: The physical lever or digital button found on the device.
- Water shut-off valve: Usually located behind the fridge or under the sink.
If your line is damaged, replace it immediately; don’t attempt to patch it with tape or glue, as leaks cause significant water damage.
Step-by-step
- Verify the water supply valve is fully open by turning it counter-clockwise until it stops.
- Push the ice bin firmly into place under the assembly to ensure it sits level.
- Lower the wire shut-off arm or toggle the digital switch to the “on” position.
- Wait 24 hours for the system to cycle through its first batch of ice.
- Discard the first one or two batches of ice, as these may contain debris or air from the installation process.
- Check that the wire arm moves freely; if it hits a stray cube, it may stop producing ice.
Tip: If you have a brand-new fridge, flush the water line by running several gallons through the door dispenser before activating the ice maker.
Careful: If you hear a loud buzzing noise but no water enters, turn the unit off and check for a kinked line. If the line is clear, the inlet valve may be faulty and requires a professional service technician.
Variations in Ice Production
The speed and volume of ice production depend on your freezer’s internal settings and the ambient temperature of your kitchen.
| Situation | Production Speed | Primary Variable | What to Watch |
|---|---|---|---|
| First Startup | Very slow | Internal temp | Initial cooling time |
| High Usage | Moderate | Bin sensors | Level of cubes |
| Freezer Door Open | Stalled | Thermal loss | Temperature spikes |
| Water Filter Clogged | Extremely slow | Flow pressure | Water flow rate |
It’s safer to start with the standard factory temperature setting and adjust it by one degree at a time if you need faster production, rather than dropping the temperature significantly all at once.
How to tell you did it right
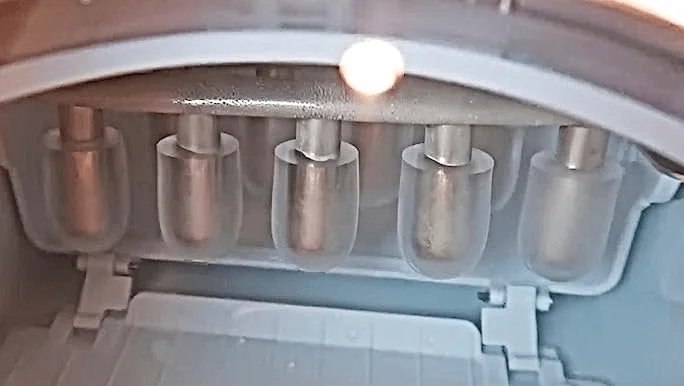
A successful setup produces clear, uniform cubes that drop into the bin without sticking together. If your cubes are small, cloudy, or stuck in a large clump, you likely have a water pressure issue or a temperature fluctuation. This happens when the water feed is inconsistent or the freezer door doesn’t seal tight, causing the ice to melt and refreeze. To prevent this, keep the bin evenly leveled and ensure the freezer door seal is clean and airtight. According to the FoodSafety.gov cold food storage charts, maintaining a consistent freezer temperature of zero degrees Fahrenheit is essential for food safety and optimal ice quality.
Maintenance and operational rules
Follow the manufacturer’s instructions for replacing your water filter, which you should perform regularly. Shut the water supply off if you plan to leave your home for more than a week to prevent leaks. After replacing a filter, always run a few cycles to clear any loose carbon particles from the line. If you notice a strange taste or odor, stop using the ice, discard the current batch, and check if the filter requires an early change. Never use harsh chemical cleaners inside the bin, as these residues can contaminate your ice.
Alternative methods for ice
Manual Ice Trays
Using plastic or silicone trays is the most reliable backup. It costs nothing beyond your time and produces high-quality, clear ice if you use filtered water. It’s a slow, manual process.
Countertop Ice Machines
Portable units sit on your kitchen counter and produce ice in minutes. They’re fast and convenient but require manual water filling and take up significant counter space. They aren’t connected to plumbing.
Professional Delivery
Buying bagged ice from a local store is the quickest way to get large amounts for parties. This costs money per bag but saves you from waiting for your home machine to cycle.
Frequently asked questions
Can I turn off the ice maker while I am on vacation?
Yes, you should turn it off to save energy and prevent potential leaks. Simply lift the wire arm to the “up” position or use the digital control panel to disable the feature until you return.
Why is my ice maker making a loud noise?
It’s likely struggling to draw water or the ice bin is jammed. Check the water supply valve first, then ensure no cubes are blocking the mechanical arm or the ejector fingers from moving correctly.
How long does it take to get a full bin of ice?
It typically takes 24 hours to fill the bin for the first time. The exact duration varies by model; check the label or user manual for the specific cycle times provided by your appliance manufacturer.
Is it safe to eat the first batch of ice?
No, you should discard the first one or two batches. These initial cubes often contain trapped air, dust from the water lines, or residual plastic particles from the new manufacturing process inside the machine.
What happens if the water pressure is too low?
Your ice maker will produce small, hollow, or misshapen cubes. If the pressure is too low, the water inlet valve may fail to open entirely, resulting in no ice production and a potential buzzing sound.
Final Thoughts
Once your bin starts filling up, you’ll want to discard the first few batches to ensure the water lines are properly flushed. Keep an eye on the supply level, and don’t forget to clean the internal tray every few months. You’ll enjoy refreshing drinks all year long with this simple routine.
