
Learning how to manually cycle ice maker units involves holding the reset button on the motor for three to five seconds to trigger the harvest cycle. This process helps you identify if the motor or water valve is causing a production failure. It is a useful task for owners whose ice maker has stopped dropping cubes despite a steady water supply.
Tools for the manual ice maker cycle
- A flat-head screwdriver: Used to remove the front cover or reach the reset button.
- A flashlight: To see the small reset switch located on the side of the icemaker unit.
- A plastic or wooden probe: Used to safely press the button if your fingers can’t fit into the housing.
- A towel: To catch any water that might spill during the cycle.
- Owner’s manual: Check the GE Appliances troubleshooting guide to verify the exact location of your reset switch, as this varies by model.
How to manually cycle ice maker: Step-by-step
- Locate the ice maker unit inside your freezer and pull out the ice bin so you have room to work.
- Remove the plastic cover on the front of the ice maker if you can’t see the reset button clearly.
- Identify the small, circular, or square reset switch, which is usually colored red or black on the side of the housing.
- Press and hold the reset button firmly for three to five seconds until you hear the motor begin to turn or a “click” sound.
- Release the button immediately once the motor engages to avoid damaging the internal gears.
- Wait for the ejector arm to rotate, which pushes any existing ice out and signals that the harvest cycle has started.
- Observe the water fill process, which should happen automatically about 30 seconds after the ejector arm returns to its home position.
- Replace the ice bin and the cover once the unit has finished the cycle to ensure proper airflow and cooling.
Careful: Don’t force the ejector arm by hand, as this can strip the plastic gears inside the motor. If the arm doesn’t move, the motor is likely dead and requires a professional replacement to avoid electrical shorts.
Factors affecting cycle duration
The time and effort required to cycle your unit depend on the model age and the current temperature of the freezer.
| Situation | Time Required | Difference | What to watch |
|---|---|---|---|
| Standard Reset | 2-5 minutes | Normal operation | Water flow |
| Frozen Lines | 10-15 minutes | Thaw time needed | Line blockage |
| Faulty Motor | 30+ minutes | Needs repair | No movement |
It’s always safer to start with a simple power cycle rather than disassembling the entire unit, as over-tightening screws often leads to cracked plastic housings.
How to tell you did it right
A successful cycle ends with the ejector arm rotating fully and the water inlet valve opening to refill the tray. If the arm moves but no water enters, you likely have a frozen water line or a faulty valve. This happens because the small tube supplying water to the ice maker is prone to freezing if the freezer temperature is too low. You prevent this by keeping your freezer set to zero degrees Fahrenheit, which ensures the water line stays clear and the ice forms at the correct speed.
Maintenance and future steps
The standard for safe home appliance operation requires that you follow the manufacturer’s maintenance schedule to prevent electrical hazards. After you perform a manual cycle, ensure the ice maker housing is dry and the cover is snapped back into place. If the unit fails to produce ice again within 24 hours, the thermostat is likely faulty. This is a technical repair; if you aren’t comfortable testing high-voltage components with a multimeter, you should contact a certified appliance technician to avoid injury or damage to your freezer’s control board.
Other ways to do it
Power reset
Switch off the circuit breaker for the entire refrigerator for 60 seconds, then turn it back on. This resets the main control board, which may clear minor electronic glitches in the ice maker software.
Hairdryer thaw
If the water line is frozen, use a hairdryer on the lowest heat setting to warm the area near the water inlet. Keep the dryer moving to prevent melting the plastic components of the freezer.
Water pressure test
Check the house water valve located behind the refrigerator. If the valve is partially closed, the ice maker won’t receive enough pressure to complete a fill cycle, resulting in very small or hollow cubes.
Frequently asked questions
Can I manually cycle ice maker units without a button?
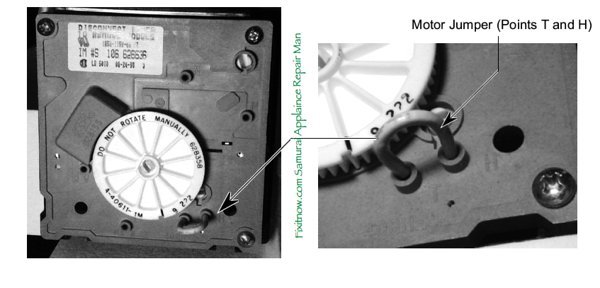
No, most modern units require the physical reset button to bypass the thermostat. If your model lacks a visible switch, you must consult your owner’s manual to see if a jumper wire is required to force the cycle.
Why is my ice maker not filling with water?
It’s usually because the water inlet valve is clogged or the supply line is frozen. Check the water pressure at your kitchen sink first; if the sink has low pressure, your refrigerator will also struggle to fill.
How long does a full ice harvest take?
It typically takes between 60 and 90 minutes for a full cycle. This assumes the freezer is set to the recommended zero degrees Fahrenheit; if your freezer is warmer, the process will take significantly longer to complete.
Is it safe to use a screwdriver to force the arm?
No, it isn’t safe and will likely break the internal gears. Always use the reset button to engage the motor; never apply manual force to the plastic components, as they become brittle in cold temperatures.
What happens if I hold the button too long?
You might trigger an error code or force the unit into a diagnostic mode that ignores normal production. If this happens, unplug the refrigerator for two minutes to reset the memory and start the process over.
Final Thoughts
If your ice maker still won’t produce a batch after this test, you’ll likely need to inspect the inlet valve or the water line for clogs. Don’t worry if you can’t fix it yourself; it’s often best to call a local technician who’s equipped to handle these specific mechanical repairs.
Related guides
