
You activate a standard refrigerator cooling system to how to work ice maker units by ensuring the water line is connected and the wire arm is in the down position. Most models require twenty-four hours to produce the first full batch of ice.
Tools to make your ice maker work
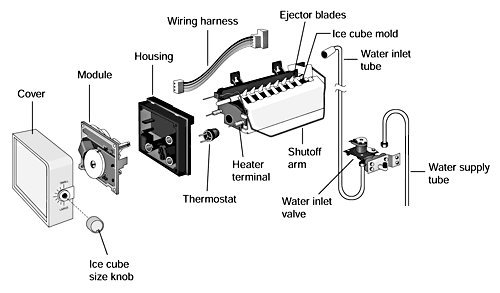
- Water supply line: A flexible copper or plastic tube connected to your home plumbing.
- Shut-off valve: Usually located behind the fridge or under the sink; ensure it’s turned to the “open” position.
- Ice bin: The storage container that slides under the ice maker.
- Water filter: Most modern fridges require a replacement water filter to meet NSF/ANSI safety standards for taste and purity.
- Leveling tool: Used to ensure the fridge sits flat, which prevents internal mechanical jams.
If you lack a dedicated water line, you can’t generate ice automatically. You must hire a licensed plumber to install one, as improper seals lead to leaks and floor damage.
Step-by-step
- Locate the wire shut-off arm: Find the metal wire protruding from the side of the ice maker assembly.
- Push the arm down: Move the arm to the lowest position to enable the automatic cycle.
- Check the water valve: Turn the handle behind the refrigerator counter-clockwise until it stops to let water flow into the unit.
- Confirm the freezer temperature: Set your freezer dial to zero degrees Fahrenheit or lower; if the freezer is too warm, the ice maker won’t trigger the harvest cycle.
- Wait for the cycle: Allow twelve to twenty-four hours for the tray to fill, freeze, and eject the first cubes.
- Discard the initial batch: Throw away the first two bins of ice, as they may contain dust or debris from the new water lines.
Careful: If you hear a loud buzzing noise, the water line is likely kinked or the valve is closed. Tip: If your ice cubes are small or hollow, check your water pressure, as low pressure prevents the mold from filling completely.
Operational variance by model
The time and effort required to maintain your system change based on your refrigerator type and local water hardness.
| Situation | Time Required | Difference | Watch For |
|---|---|---|---|
| Hard Water | Monthly | Mineral buildup | Scale in molds |
| Low Pressure | 5 minutes | Filter check | Slow fill rate |
| New Install | 24 hours | Initial cooling | Water leaks |
How to tell you did it right
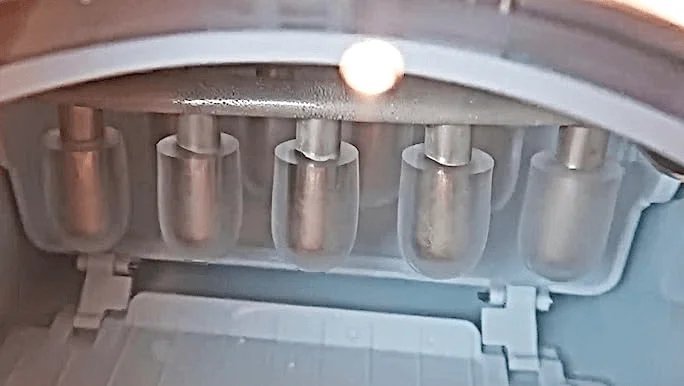
A successful setup produces clear, solid cubes that fall easily into the bin. If the ice comes out white or cloudy, it’s often due to trapped air or high mineral content in your water supply. This is a common quality issue, but it doesn’t mean the machine is broken. To prevent clumping, shake the bin periodically to keep the cubes separated. If the ice maker stops producing entirely, check that the wire arm hasn’t been accidentally bumped into the “off” or “up” position.
Maintenance and safety standards
The manufacturer’s manual dictates the specific maintenance schedule for your unit. You must replace the water filter regularly to prevent bacteria growth and ensure the ice remains safe for consumption. After replacing a filter, flush the system by running two gallons of water through the dispenser to clear trapped air. If the ice maker leaks, shut off the water supply valve immediately and contact a professional technician. Never attempt to repair the internal electrical components yourself, as this creates a significant risk of shock and voids your warranty.
Different approaches to ice
Manual ice trays
Using standard plastic trays is the most reliable method. It costs almost nothing but requires active effort to fill and empty. This is the best choice if you have low water pressure.
Countertop ice machines
These standalone units produce ice in ten minutes. They’re fast but occupy significant counter space. They aren’t connected to plumbing and require manual water refills after every few cycles.
Portable ice bags
Buying bags of ice from the store is the simplest alternative. It costs money per bag but provides the highest volume of ice for parties. This method saves you from all mechanical maintenance.
Frequently asked questions
Can I turn off the ice maker?
Yes, simply lift the metal wire arm until it clicks into the “up” position. This stops the machine from attempting to cycle without needing to unplug the entire refrigerator from the wall.
Why is my ice maker leaking?
It’s likely caused by a loose water line connection or a cracked fill tube. Check the back of the fridge for moisture, but call a professional if the leak originates from inside the internal freezer wall.
How long does ice stay fresh?
Ice stays fresh for about one month in a freezer. After this time, it begins to absorb odors from other frozen foods, which changes the taste of your drinks even if the ice looks clean.
Is it safe to eat cloudy ice?
Yes, cloudy ice is safe to consume. The cloudiness is usually just trapped air bubbles or minerals from your water supply, which don’t pose a health risk to the average person.
What happens if the power goes out?
The ice will begin to melt if the power stays off for more than four hours. Once the power returns, discard any melted ice to prevent the cubes from refreezing into one solid, unusable block.
How do I reset the ice maker?
You can reset most models by unplugging the refrigerator for sixty seconds and then plugging it back in. If this doesn’t work, check your manual for a specific reset button located under the ice cover.
Final Thoughts
If your bin stays empty after a full day, check the freezer temperature to ensure it’s cold enough for freezing. You shouldn’t worry if it takes a little trial and error at first. Once the cubes start dropping, you’ll have plenty of ice ready whenever you need a cold drink.

Pingback: How to Install Under Counter Ice Maker: Step-by-Step Guide
Pingback: What Is the Best Undercounter Ice Maker: Our Top Home Pick